Wednesday, November 3, 2010

Getting in the Spirit at Holiday Hoopla!

I think I have something special to share that will hopefully inspire you to start thinking about your holiday crafting projects for the upcoming holidays - if you haven't already!  I don't know about you, but I never seem to be ahead of the game when it comes to getting ready for Christmas!  I put a note in my calendar this year that I will be done by December 1st this year and I think I got a good bump in that direction at Holiday Hoopla!!


One of my Uplines, Marlayne, organized this wonderful event and I went with one of my stampin' buddies, Stephanie!  We were up really early (for a Saturday) and spent the day learning about so many wonderful ideas and there were so many great projects we got to see and try!  I took lots of pictures of the Share Boards of my fellow demo's ideas, cards, scrap book page layouts and 3d items for the holidays - what great inspiration!! My mind is still whirling with ideas!  I don't know where to start *chuckle*


These are the projects that we got to make and take home!  Marlayne swears by kits and these projects were all assembled from the kit with a few stamps, embellishments and some ribbon.  We got to "make-and-take" them home!! Marlayne is brilliant and in organizing her Holiday Hoopla event, she saved herself some stress by using the Christmas Cheer Simply Scrappin' Kit (Item #117401) and shared a good amount of Marina Mist 1-1/4" Stripped Grossgrain Ribbon (Item #119772) with a couple buttons from the Candy Cane Big Designer Button Set (Item #121718) to make all of the goodies you'll see below! 


this is a box about 6"x6" made with designer paper from the kit as well as the snowflakes die cuts (stickers) layered with circle of marina mist cardstock - doesn't the ribbon just look wonderful with it?  And all the projects we made fit neatly inside once it was all done!


And here are all the projects from inside the box!  
6 projects all together some more complicated then others.


Isn't that banner lovely!   Imagine it on an office door or cubicle at work or hanging in a place of honour just inside the front door to greet your holiday guest?!  Did you notice that each letter is set on a different textured piece of card stock?  It was so easy to zip them through the Big Shot in the different folders to add that extra bit of pizazz!


Neat little mini 'album' made with a note card and envelop with pull out pages for pictures, comments and more - wouldn't grandma/mom/auntie just love to whip that out of her purse at book club?

 Or give the gift of cards?  3 sweet card that all tuck into this adorable top note card holder with gift tag label!


This is a sweet gift card holder.  Boarder Punch and the window is punched with the new label punch and the pine cone stamps from the new stamp set!


 Have you ever thought to use stamps on textured card stock?  Why not!  Give it a try and add another dimension to your projects!


 Use the window you punched out on the pocket inside the card holder - waste not want not - right!?  (I tucked a magnet into the pocket so you can see it better - that's what that black square is *laugh*)


This was so quick and easy, it's almost embarrassing!  Why not jazz up some simple treats with a pretty little pocket!  You don't even need glue, just tie the ribbon around to hold it together and attach a sweet little tag!

This one was not one of the Make-n-Takes - but I had to show you anyway!  This is Bitty Box made with Real Red Card stock with one of our our Big Shot dies (Item #115967), embellished with snow flakes in Whisper White Card stock and the  Northern Frost Decorative Strip Die (Item #120901) - one of the Demo's from Demonstrator Theatre not only had 2 great projects to show us but she also made a bunch of these mini boxes to give out at her demonstration station filled with treats - so sweet!

I am seriously trying very hard not to go nuts buying all the neat little box dies they have but this one might just have to be next on the list!  So many things you can do with it!! Imagine sneaking little notes/treats into your hubby/kid's lunches? Turn it into gift/ornaments on your tree - just add a bit of ribbon! Or for the gang at the office?  Neighbors? Teachers? The Paper Boy/Girl?  The Post Carrier?  etc. etc.


Here is another look at all the projects all laid out!   What a wonderful day!  I'm so glad that I went and got to spend a fun day with a good friend and get inspired for the holiday season that's fast approaching!  Are you thinking about what you are going to do for the holidays yet?  Maybe some of these ideas have inspired you too?  Feel free to send me an email for more information about the projects displayed on this page or any other questions you might have! 

Now, why not pull out your crafting supplies and give some of these ideas a try today?

Until Next time ...... *HUGS!!*

Tuesday, November 2, 2010

Fun, Furry Friend!


It was my Dad's birthday Oct 26th and I decided to use my Sock Monkey stamp set (Item #111550) to make his card.  The senement is from Heard From The Heart Stamp Set (Item #111644).  The Card stock I used was was 8-1/2x11" Card stock in the following colours:  Early Esspresso (Item #119686), Poppy Parade (Item #119793) and Very Vanilla (Item #101650), the grey is retired.  I used a mini library clip (Item #109857) and a bit of red gingham ribbon (Item #104827) which is a clearance item so will only be available while supplies last.  You could also use the new 1/8" Taffeta Ribbon (Item #119251) in Real Red or a co-ordinating colour of your choise.
This is the inside cover - to add some interest I also stampped the balloon from that Sock Monkey set, and used the banana as a background stamp along with some of the scraps I had left over to layer and create another image.  The string is hand drawn using Early Esspresso marker as well as the personal message on the small piece of Poppy Parade "On Your Birthday"

This card is great for a man, young or young at heart, with a sense of humour or nastalgia.  It could easily be adapted for just about anyone!  Change up the colours and add a border punch to give it a more feminie touch?

If you are interested in any of the items I've used to create this card, click on the underlined link to see an image of the item or go to the Stampin' Up! Costomer page and punch in the code to see more information about the item.  And of course, you can always give me a shout if there is anything you'd like to order *wink*!!

Why not pull out your crafting supplies and try a card like this today!  And please, snap a shot and email it to me!! I love to see your work too!

Until next time .... *HUGS!!*


Monday, November 1, 2010

More Punch Art ... Pretty Purses!!!


I've been sitting on this sweet little project for a while too and finally I'm sharing it with you, I hope you give it a try!  I have a friend who has passion for purses!  One of my favorite story about her was her trip to New York and the adventure she had shopping for "discount designer purses"!  With this in mind, when her birthday rolled around I knew I just had to do something with a purse!  Fortunatly for me, there are lots of creative people out there that already figured out how to use punches to make some adorable purses and I used their tips and with a few of my own to create this card for my friend!


The body of the purse is made with the Round Tab Punch (Item # 119864).  If you just cut your punched image in half then turn it on it's side you've got the body for the punch - I bumped it up a knotch by mixing and matching my purses by turning my 1/2 tab punched purse in half and used the curvy part to punch out the top to give my purse that 2 toned look - kinda looks like there's a leather flap at the top, don't you think?  Then use the 2 oval punches (Large Oval Item #119855 & Small Oval Item #119863 )to create the handles and the word window punch (Item #119857) to create the flap (held in place with a heart brad - not SU).  The designer series cardstock was Cottage wall, which is now retired.  You can use any combination of DS paper and card stock that appeals to your eye!  I layered the purses with a small square of designer series paper on a coordinating square of cardstock and using the Corner Punch (Item #119871) on only 2 oposit corners of each square, created a pin wheel design to add some interests.  For the sentement I used the small ovals I punched out fo the centers of the 4 hand bag straps to layer my greeting to add a little pizazz to my card front!

Plain and simple or with a bit of a twist - these little purses can jazz up any project from a card to a scrap book page!  Add some couture to your next project with a hand bag or two!

TRY IT TODAY!!

Friday, October 29, 2010

More Punch Art ... Paper Roses!!!


I made this card last summer but hadn't posted it as I hadn't had the chance to give it to the intended recipient!  The cardstock and DSP I used is no longer available but I wanted to share the technique with you so that you can give it a try too! 

Can you believe that I made that rose and those buds with the new flower punch?  Well I did!  The moment I saw this technique, I just had to try it.  First you punch out 3 flowers with the punch.  Then you cut one petal from the first flower (like a pie to the center of the flower) leaving 4 petals and a triangle cut out of it.  The next flower, you cut 2 petals together (it will look like a heart) and will leave 3 petals on the other piece.  The last flower you leave whole, except for one slit into the middle of the flower between 2 petals.


The buds are just the single, double and triple petals rolled up and curled using your bone folder.  It helps if you play with the paper a little bit before you punch out the flowers to make it soft (break up the fibers a little).  You can also spung or stamp colour onto the paper to help this process.

First, curl up the single pie piece, rounded edge up and secure with a drop of strong glue (trombo or tacky strip will work) then carefully use the tip of your bone folder and your thumb to curl the rounded edge of the petal over to open up the center of the flower. Then Nip off the tip so that it will nest into the next layer nicely.

Next, the 2 petal 'heart' shaped piece, fold it over onto itself and create a little pocket in the center where you can slip the single petal - this would be a good bud.  Again, use your thumb and the tip of your bone folder to curl the edge over.  Nip the tip for the next layer.

Continue with the 3, and 4 petal sections, folding over to glue one petal over the other leaving 2 and 3 petals and staggar them together glueing as you go.  Continue to trim off the tip before nesting them into the next layer

The last one is the 5 petal flower with the slit, over lap 2 petals making it a 4 petal and glue the others to the center.  Trim off the point to flatten it.  I used a large glue dot to secure it to the page.  Now you can tweak your petals a little and add some greenery to make your rose complete.


I gave it some greenery in a couple shades of green using the 5 petal flower punch and my bone folder to press veins into the leaves before nipping them so that there were 2-3 leaves (petals) per section.  Then I added some bling to finish off my card!  What do you think?  Can you master this 3D punch art?  I'll bet you can - these pictures are of my second attempt!! If I can do it, I know you can too!

Let me know how you did!

Saturday, August 7, 2010

Coming Soon - Virtual Garage Sale!

Yep, I've finally gone through my retired stamp set, colour supplies and I will be having a virtual garage sale!!  Here is a shot of the box that I have collected and am in the process of organizing and finding out the original prices so you'll know what a DEAL you are getting!


Please let me know if there is anything that you are looking for that might be in there!

Stay tuned for more information and please let me know what you want/need!

Everything will be First Come/First Serve ... pick up preferred but in some cases delivery options are available (if you want items shipped to you - shipping and handling will be extra).

I'm so excited!  Hope you are too!!

Friday, July 30, 2010

Yes, It's here!

The 2010-2011 Idea Book & Catalogue was introduced on July 1st, 2010!  I've updated my link to the pdf file if you'd like to have a look.  There are lots of new sets and many old favorites, new accessories and punches (not to mention the whole new punch body!).  The new colour families are great and Stampin' Up will also be offering some great kits to help you update your supplies with the new colours too!


Including Markers, Watercolour Wonder Crayons, Stampin' Pastels, Card stock and Ink pads etc!

The new catalogue is so exciting, I just don't know where to start.  For my regular customers, I am sending in my catalogue order this weekend, so I should have copies for you in 10 days!   Make sure you let me know if you want one so I can order enough!

Also, there is a new Hostess Promotion running for the month of August!  For workshops over $450 in sale you will earn an EXTRA $35.00 in FREE PRODUCT!!! On top of the regular hostess benefits for a workshop - isn't that so cool?!!  I hope that some of you will take this opportunity to have a workshop this month and get your extra free product!  Call me today to set up your workshop in August!!!

Enjoy the long weekend and I'll have some new projects for you soon!

Happy Stamping!!

Sunday, June 27, 2010

Congratulations! It's Twins!


My girlfriend Tanya and her husband Marco are now the proud parents of twin girls!  I wanted to make a fun, bright and colourful card to congratulate them on the arrival of their girls so I decided to try a fun Sesame Street inspired card primarily using the Scalloped Circle punch (item #109043).


After I completed the card, I thought I had better make some more of these adorable little characters to document how it is done so that you can give them a try too.  The supplies I used are as follows:


  • Scalloped Circle Punch (item #109043) 4x
  • 1-3/8" Circle Punch (item #104401) 1x 1/2
  • 1-1/4" Circle Punch (item #104403) 2x 1/2
  • 1" Circle Punch (item #109046) 5x
  • 3/4" Circle Punch (item #107217) 4x
  • 1/2" Circle Punch (item # 104390) 4x
  • the Itty Bitty Circle punch from the Punch Pack (item #118309) 4x
  • Boho Blossoms Punch (item #110711) 2x 1/2 1x
  • Modern Label Punch (item #116630) 2x
  • Card Stock (Whisper White, Basic Black, Real Red and Retired colours: Bermuda Bay, Brilliant Blue, Glorious Green, Crushed Curry, Barely Banana, Dusty Durango, Caramel)
  • Markers: Basic Black (item #105394) and Chocolate Chip (item #100071)
  • Uni-Ball Signo Gel Pen (item #105021)
  • Snail Adhesive (item #104332)
  • Stampin' Dimensionals (item #104430)
  • Paper snips (item #103579)
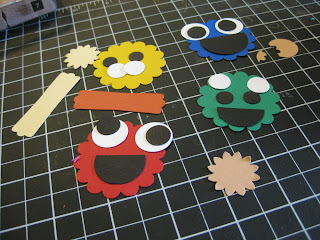
You will need to punch out your 4 scallops in the 4 primary colours (Brilliant Blue for Cookie Monster, Glorious Green for Oscar the Grouch, Crushed Curry for Big Bird and Real Red for Elmo) you will need to punch out 4x1" Circles of Whisper White and 4x3/4" Circles of Basic Black (for Cookie and Elmo's eyes).  Then 4x3/4" Circles of Whisper White and 4xItty Bitty Circle in Basic Black (for Big Bird and Oscar's eyes).  Use the Modern Label Punch in Barely Banana and Dusty Durango (Big Bird's beak and Elmo's nose)  Also, punch the large blossom from Boho Blossoms in Barely Banana.  Another large blossom from the Boho Blossoms punch in Caramel and a 1" Circle as well as (tip: if you punch all 3 blossoms out before you punch your 1" circle for the cookie, you can line up the small flower to look like a bite then nips off a piece from that same small flower to be the "crumbs" in his mouth) colour chocolate chips onto this circle to make it a cookie. For their mouths you will need 2 half (or 3/4) 1-1/4" and 1 half (or 3/4) 1-3/8" circles of Basic Black (Cookie's gotta big mouth!)  
Then, assemble all your pieces for each character to make sure you have everything you need.  Then, using your snail adhesive and paper snips, assemble your characters.


 I used my paper snips to make a wavy cut along the top of each half circle to give it that "furry" lip look like in the drawings.
 Cookie Monster's eyes (1" whites, 3/4" black) are always a little cock-eyed and he has the biggest mouth.  Make sure to put his eyes on the very top of the scalloped circle, pointed in opposite directions.


Use the uni-gel pen to put a little highlight in the eye and use a dimensional to pop up his cookie, snip the 'crumb' in half and glue the pieces randomly into his mouth.

 Using the paper snips, cut out an oval from the center of the Modern Label in Dusty Durango for Elmo's nose.  Do not discard the scraps, you will need a part of this for Big Bird's mouth and I used another small piece for Oscar's tongue.


    Elmo doesn't have any problems looking you straight in the eye (1" white and 3/4" black) but his nose does tend to hang over his mouth just a bit *grin*.  I used the larger circle punch for his mouth too but you can use the 1-1/4" whichever looks better to you.  Add a highlight to his eyes too.


    Oscar's mouth is smaller then the other 2 because he's not really a smiley type of guy.  His eyes are smaller too (3/4" white & itty bitty black).  He also has funny bushy eyebrows - the large blossom from the Boho punch cut in half works great


    You may need to trim the center of his eyebrows a little to get his eyes close enough and you need to snip his eyes into an angel to give him that frowny looks he's known for. (he looks a little funny at this angel but trust me, that's how he looks *chuckle*) Give his eyes a little highlight too and use your black marker to extend the corners of his mouth.

    Of course, I save the trickiest one for last!  Big Bird!  Here is how I cut the Modern Label punched pieces to make his beak.  The top part in Barely Banana (right side) is the top of his beak, the Dusty Durango on the bottom left, is inside his mouth.  I also trimmed the left side of the Barely Banana piece to create his lower part of his beak with the Dusty Durango between the 2 BB pieces.


    You also need to create eye lids with blue edges for his eyes.  I just punched out 2 x 3/4" Circles in Crushed Curry and using the itty bitty punch first, the inner edge of the Bermuda bay before punching out the other edge with the 3/4" punch creating a thin half circle for each eye.  Glue these slivers with a little bit of curry showing over the top and then trim out the centers and glue them to his eyes.

    The large blossom from the Boho Blossom punched out earlier gets glued to the center of the Scalloped Circle and the beak and eyes are glued close together over this piece - it is to give the suggestion of his extra feathers (on the card, I added 3 "feathers" to the top of his head snipped from the left over pieces used to make his beak).

    That is how you make these cute little characters!  Since I had already made the first set for my card, I put magnets on the back of these 4 to use as fridge magnets (actually going to gift them to a co-worker for her daughter who just LOVES these characters - she will be THRILLED!!)


    I used my 1-3/8" Circle Punch to punch out circles from an old magnet I had. Then used tacky strip to secure each character to their own circle.  And here is the gang on my fridge helping to hold up some friends and their art work too! 


    Hope you enjoyed my little tutorial and will give these guys a try too!  That's it for now - tune in again to see how to make miniature purses using the Rounded Tab Punch! 

    Saturday, June 12, 2010

    More Punch Art ... Hula Girl


    In my Stamping Group this week, one of my fellow demo's asked about the recipe for a Hula Girl made with punches.  Another demo, inspired by the query - whipped out her punches and created the recipe and then posted it on her blog here.  I was inspired but I did not have all the same punches so had to improvise...

    If you punch the 1" circle punch first - for her face, then the 11/4" (discard this ring) and then the 13/4" to get the larger ring used for the arms.  Then punch out her body with the Round Tab, using the 13/4" to trim away the curly cue (not very waist like).  I also used the small heart from the Heart to Heart punch (2x cut off one lobe of each heart for her feet)


    I used the 11/4" circle punch to create her hair.  I used the 5 Petal Flower punch to create her bangs (just using 2 points of the flower).  The first time I did this in 2 pieces, the second time, I just punched the bangs from the 1 piece and tucked her face over lapping the punched part.

    The grass skirt is the 13/4" circle punch again, using the small oval punch to nip away the part for the waist.  Using the paper snips, cut up from the bottom leaving about a 1/4" inch to make the grass part of the skirt.


    It's already starting to look like a hula girl and it's not even assembled yet!  I used the Itty Bitty Shapes punches to make the flowers and greenery.  The centers of the flowers were punched during another project with the large hole on the Crop-a-Dile!  These parts will embelish the waist line of the skirt, accent her hair and create the garland around her neck.


     Now, line up the waist of your skirt along one flair of the torso.  I used the 2-way glue to assemble all the pieces.  First gluing the skirt to the torso then the

    4 little green bits to the skirt.  You don't really need these, but it adds a little je ne say qua to the whole thing.  You will have to attach the feet to the background, once your hula girl is assembled and put in place.


    Next, you will have to line up your "arms", the large 13/4" circle you pre-cut earlier.  Line it up on the back of your torso and trim off any excess "shoulder" material before you assemble the head and put it in place.

    I didn't take any pictures of  this part, but you will see the finished assembly in the final picture.  I glued one of the little left over hearts from the using my Pinking Heart Boarder punch makes a perfect little cupie mouth.


    The bangs cut out with the 5 Petal Flower punch (or you can use 1/2 of a 1" circle in the same hair colour CS) layered over the 1" face circle, with the little heart mouth, glue them all together and then using the bottom edge of the hair to attach the head to the torso.  Also, assemble all the little flowers with their centers and greenery accents and glue them to hide the edges of the shoulders in a garland fashion.

    Now you are ready to place your hula girl on whatever you like, scrapbook page, card or to embellish a gift.


    I put my girl in a tropical scene on a card front with a hand cut palm tree, some lovely hand torn sand and a couple of coconuts!


    This little gal would also look wonderful with touches from the new Tropical Party stamps set, available in the Summer Mini (page 26).  Here are some shots of how I assembled my card and the final product.


    *Chuckle* the second one (on the left) is a little taller and thinner then the first one I made (on the right).  Summer fun!  Give it a try!

    Reminder: I am sending in an order on June 18th!  Email me today with your order and win a chance to be the mystery Hostess, free stamp set or $20.00 in free product!  Also, let me know if you are ordering a 2010-2011 catelogue!  They will be comming out July 1st, 2010!!  Are you excited yet?  I am!!

    Tuesday, June 1, 2010

    It's A Colour Renovation!!!

    All of Stampin' Up! is a buzz about the Colour Renovation!  Many of the colours you are familiar with are soon going to be retiring and many of the colours that you've come to know over the past few years of "In Colours" will be welcoming back some old friends!

    Have a look to see if your favorite colour has made the cut or not.  First, the New Colour Collections:


    And here are the Fond Farewell:


    I have been a Bright Bold girl since day one and all but 2 of them are retiring *sniff/sniff*  But in the new Bold Collection, I get Rich Razzleberry, Pacific Point and Melon Mombo!  And, I do get to keep Real Red and my beloved Tempting Turquoise (my all time favorite!)  Some other colours from other families are now under the Bold collection too like Old Olive, Regal Rose and Pumpkin Pie!  I love the expanded version of the Neutral, the Regal and the Subtle collections too!  I can't wait to see the 2010-2011 Catelogue to see what other changes they have made!


    Let me know what you think of the changes and if you need any re-inkers/paper/accessories in your favorite colour while they are still available!

    Friday, May 28, 2010

    Struck by Inspiration

    What are ya gonna do?  When inspiration hit ... you gotta be creative! Right?


    Here are a couple of cards I made while waiting for a friend to pop by for a visit.  It's a new stamp set from a recent order; Water Colour Trio stamp set (I just love it - so pretty!)  I used a combination of Bright Bold and Rich Regal colours to make these pretty cards.


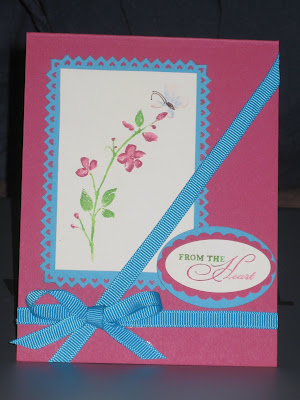
    This one is Very Vanilla on Rose Red card stock with accents of Tempting Turquoise punched with the Pinking Hearts boarder and corner punch, the Scallop Oval, Large Oval and Oversized Oval punches too.  I used my markers with Rose Red and Regal Rose from the Rich Regals and Green Galore and Gable Green from the Bright Bolds.  The butterfly was done in Basic Brown, Brilliant Blue, Only Orange with a tiny touch of Yoyo Yellow from the Bright Bolds - but as it was the 3rd stamp without a reload, it's very VERY subtle (touched up the body and added the antenna after stamping).


    Note: Rose Red & Regal Rose will both be with the New colours in the "Colour Renovation" but both Gable Green and Green Galore will be retiring at the end of June *sniff sniff*  I have been a bright bold girl since day one and I hate to see any of "my" colours retire!  But there will be some of the past "In Colours" that will be back as part of the upcoming Colour Renovation.  Stay tuned for more on this - or email me for a list of the New Colours and the list of colours that will soon be gone.


    This card was just one accident after another! *chuckle*  I had intended to put the mounted stamped image with the Tempting Turquoise background on this card front but once I put the ribbon in place, I hadn't left enough room for the edge of the ribbon on the left hand side.  I had stamped 3 different image one after the other on a piece of Very Vanilla card stock, and this image was in the middle.  For some unknown reason, when I was cutting the 3 images apart, I wasn't paying attention when I lined up my cutter for the right side of this one and cut through through the butterfly!  After a moment to think about it, I decided to cut the remaining image in 3 so I could spread them out as I did above.  At first I was going to mount them on another piece of cardstock but once I had made the error with the width of my ribbon bubbles, I knew that the solution was to slip the one piece INTO the bubble to get the spread that I wanted... and it worked!

    Regal Rose Ribbon, Very Vanilla & Green Galore card stock, Ice Pink Rhinestone brads (same markers as above - 2nd stamp off of the butterfly).

    I just love happy accidents, don't you?

    I did have one more image but I haven't finished that card yet ... I'll post it as soon as it's finished, I promise!

    LinkWithin

    Related Posts with Thumbnails