My girlfriend Tanya and her husband Marco are now the proud parents of twin girls! I wanted to make a fun, bright and colourful card to congratulate them on the arrival of their girls so I decided to try a fun Sesame Street inspired card primarily using the Scalloped Circle punch (item #109043).
After I completed the card, I thought I had better make some more of these adorable little characters to document how it is done so that you can give them a try too. The supplies I used are as follows:
- Scalloped Circle Punch (item #109043) 4x
- 1-3/8" Circle Punch (item #104401) 1x 1/2
- 1-1/4" Circle Punch (item #104403) 2x 1/2
- 1" Circle Punch (item #109046) 5x
- 3/4" Circle Punch (item #107217) 4x
- 1/2" Circle Punch (item # 104390) 4x
- the Itty Bitty Circle punch from the Punch Pack (item #118309) 4x
- Boho Blossoms Punch (item #110711) 2x 1/2 1x
- Modern Label Punch (item #116630) 2x
- Card Stock (Whisper White, Basic Black, Real Red and Retired colours: Bermuda Bay, Brilliant Blue, Glorious Green, Crushed Curry, Barely Banana, Dusty Durango, Caramel)
- Markers: Basic Black (item #105394) and Chocolate Chip (item #100071)
- Uni-Ball Signo Gel Pen (item #105021)
- Snail Adhesive (item #104332)
- Stampin' Dimensionals (item #104430)
- Paper snips (item #103579)

You will need to punch out your 4 scallops in the 4 primary colours (Brilliant Blue for Cookie Monster, Glorious Green for Oscar the Grouch, Crushed Curry for Big Bird and Real Red for Elmo) you will need to punch out 4x1" Circles of Whisper White and 4x3/4" Circles of Basic Black (for Cookie and Elmo's eyes). Then 4x3/4" Circles of Whisper White and 4xItty Bitty Circle in Basic Black (for Big Bird and Oscar's eyes). Use the Modern Label Punch in Barely Banana and Dusty Durango (Big Bird's beak and Elmo's nose) Also, punch the large blossom from Boho Blossoms in Barely Banana. Another large blossom from the Boho Blossoms punch in Caramel and a 1" Circle as well as (tip: if you punch all 3 blossoms out before you punch your 1" circle for the cookie, you can line up the small flower to look like a bite then nips off a piece from that same small flower to be the "crumbs" in his mouth) colour chocolate chips onto this circle to make it a cookie. For their mouths you will need 2 half (or 3/4) 1-1/4" and 1 half (or 3/4) 1-3/8" circles of Basic Black (Cookie's gotta big mouth!)
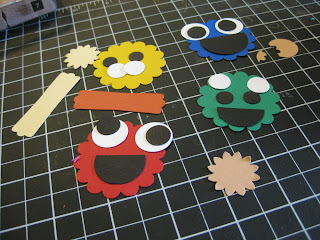
Then, assemble all your pieces for each character to make sure you have everything you need. Then, using your snail adhesive and paper snips, assemble your characters.
I used my paper snips to make a wavy cut along the top of each half circle to give it that "furry" lip look like in the drawings.
Cookie Monster's eyes (1" whites, 3/4" black) are always a little cock-eyed and he has the biggest mouth. Make sure to put his eyes on the very top of the scalloped circle, pointed in opposite directions.
Use the uni-gel pen to put a little highlight in the eye and use a dimensional to pop up his cookie, snip the 'crumb' in half and glue the pieces randomly into his mouth.
Using the paper snips, cut out an oval from the center of the Modern Label in Dusty Durango for Elmo's nose. Do not discard the scraps, you will need a part of this for Big Bird's mouth and I used another small piece for Oscar's tongue.
Elmo doesn't have any problems looking you straight in the eye (1" white and 3/4" black) but his nose does tend to hang over his mouth just a bit *grin*. I used the larger circle punch for his mouth too but you can use the 1-1/4" whichever looks better to you. Add a highlight to his eyes too.
Oscar's mouth is smaller then the other 2 because he's not really a smiley type of guy. His eyes are smaller too (3/4" white & itty bitty black). He also has funny bushy eyebrows - the large blossom from the Boho punch cut in half works great
You may need to trim the center of his eyebrows a little to get his eyes close enough and you need to snip his eyes into an angel to give him that frowny looks he's known for. (he looks a little funny at this angel but trust me, that's how he looks *chuckle*) Give his eyes a little highlight too and use your black marker to extend the corners of his mouth.
Of course, I save the trickiest one for last! Big Bird! Here is how I cut the Modern Label punched pieces to make his beak. The top part in Barely Banana (right side) is the top of his beak, the Dusty Durango on the bottom left, is inside his mouth. I also trimmed the left side of the Barely Banana piece to create his lower part of his beak with the Dusty Durango between the 2 BB pieces.
You also need to create eye lids with blue edges for his eyes. I just punched out 2 x 3/4" Circles in Crushed Curry and using the itty bitty punch first, the inner edge of the Bermuda bay before punching out the other edge with the 3/4" punch creating a thin half circle for each eye. Glue these slivers with a little bit of curry showing over the top and then trim out the centers and glue them to his eyes.
The large blossom from the Boho Blossom punched out earlier gets glued to the center of the Scalloped Circle and the beak and eyes are glued close together over this piece - it is to give the suggestion of his extra feathers (on the card, I added 3 "feathers" to the top of his head snipped from the left over pieces used to make his beak).
That is how you make these cute little characters! Since I had already made the first set for my card, I put magnets on the back of these 4 to use as fridge magnets (actually going to gift them to a co-worker for her daughter who just LOVES these characters - she will be THRILLED!!)
I used my 1-3/8" Circle Punch to punch out circles from an old magnet I had. Then used tacky strip to secure each character to their own circle. And here is the gang on my fridge helping to hold up some friends and their art work too!
Hope you enjoyed my little tutorial and will give these guys a try too! That's it for now - tune in again to see how to make miniature purses using the Rounded Tab Punch!